Honda ADAS Calibration Guide [Step-by-Step Tutorial]
Honda ADAS Calibration Operation Instructions Advanced Driver Assistance Systems (ADAS) have become a vital component of modern vehicles, enhancing safety, reducing human error, and aiding drivers in critical moments. The Honda is equipped with a sophisticated ADAS suite, including features such as lane departure warning, forward collision warning, and adaptive cruise control. Proper calibration of ADAS […]
![Honda ADAS Calibration Guide [Step-by-Step Tutorial]](/uploads/2025/09/Honda-ADAS-Calibration-1280.webp)
Honda ADAS Calibration Operation Instructions
Advanced Driver Assistance Systems (ADAS) have become a vital component of modern vehicles, enhancing safety, reducing human error, and aiding drivers in critical moments. The Honda is equipped with a sophisticated ADAS suite, including features such as lane departure warning, forward collision warning, and adaptive cruise control. Proper calibration of ADAS sensors especially after repairs, replacements, or error codes is crucial to ensure their accurate functionality.
This comprehensive guide details the ADAS calibration procedure for the Honda , helping technicians, workshop professionals, and Honda vehicle owners understand the process, requirements, and best practices for both static and dynamic camera calibration.
Why ADAS Calibration is Crucial
Importance of Calibration After Repairs
Incorrect calibration can lead to:
- Unreliable adaptive cruise control
- Reduced road safety
- Inaccurate lane detection
- Faulty collision warnings
Calibration is typically required after:
- Suspension or wheel alignment changes
- Error codes related to ADAS functions
- Replacing the front camera
- Replacing the windshield
Common Calibration Fault Codes in Honda
If you encounter the following Diagnostic Trouble Codes (DTCs), calibration is necessary:
- B2A60-54 – Static camera alignment not done
- B2A60-52 – Dynamic camera alignment not done
These codes often appear after camera replacement, windshield installation, or ADAS control module resets.
Pre-Calibration Checklist
Before starting the calibration process, ensure the following:
- The vehicle is parked on a level surface.
- The calibration area is free of obstacles.
- All unrelated fault codes are cleared.
- The camera lens is clean and unobstructed.
- There are no direct light sources interfering with the camera.
Equipment Required
To perform a successful calibration, you’ll need:
- ADAS Calibration Tool (ADAS Mobile or equivalent)
- LAM01-20 targets (for lateral calibration)
- Measuring tools (to set distances and height)
- Diagnostic scan tool compatible with Honda models
✅ Pro Tip: Use OE-approved tools to ensure accuracy and compliance with manufacturer standards.
Step-by-Step Guide to Honda ADAS Calibration
1. Scan the VIN
-
- Use a scan tool to read the Vehicle Identification Number (VIN)
- Select the appropriate model and region (e.g., USA)
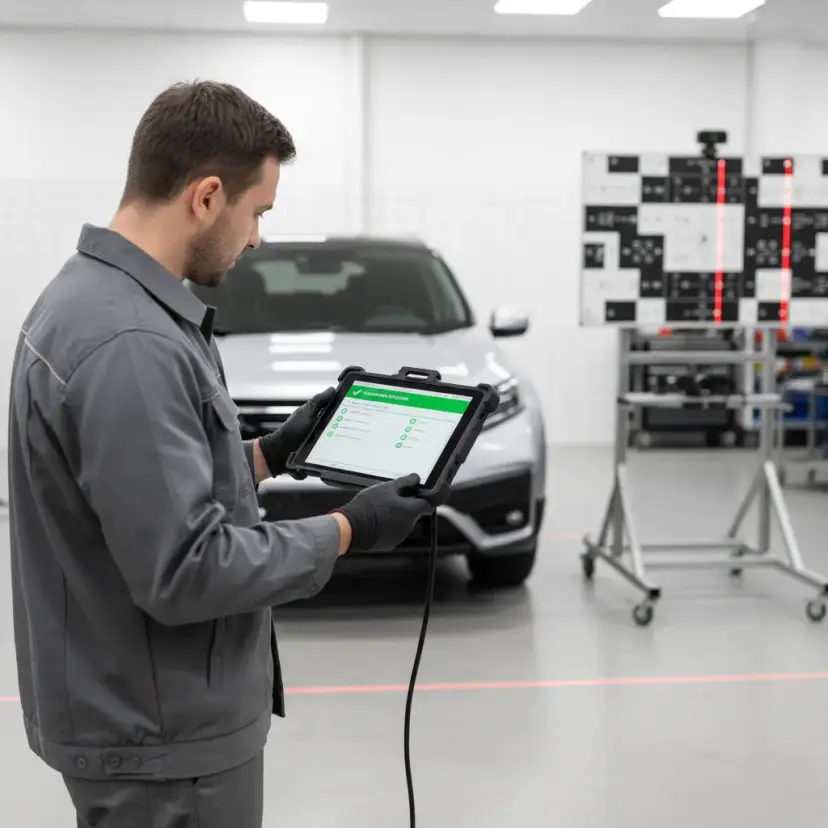
2. Access ADAS Calibration Module
-
- Navigate to the ADAS Calibration section in the diagnostic software.
- Select “Front Camera Calibration”
- Choose the device type select ADAS Mobile if using that platform.
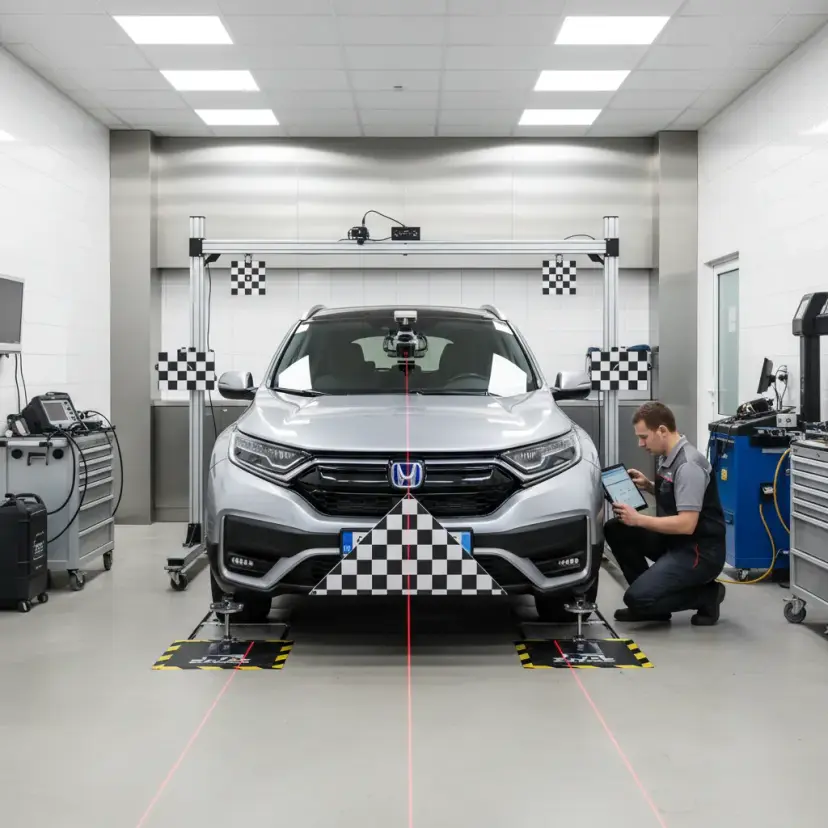
3. Static Camera Calibration
a) Target Placement
-
- Set up the target at a distance of 6000mm in front of the vehicle.
- Adjust the height to 1150mm.
- Ensure the target is perfectly parallel to the vehicle’s centerline.
- Mark reference points A and B to ensure alignment.
b) Hub Height Measurement
-
- Measure the height of both front wheel hubs.
- Compare with standard values to calculate the error range.
- Choose the error range setting in the calibration tool (e.g., -15mm to -5mm).
c) Intermediate Target Calibration
-
- Calibrate the center target first.
d) Side Target Calibration
-
- Install LAM01-20 800mm to the left of the centerline. Calibrate.
- Then move the target 800mm to the right. Calibrate.
e) Complete Static Calibration
-
- Once completed, turn off and restart the ignition.
- Review the ADAS calibration report to confirm success.

Dynamic Camera Calibration (If Required)
Dynamic calibration is prompted automatically if required.
Conditions:
- Drive the vehicle at a consistent speed of 72–110 km/h (45–70 mph)
- Stay centered in the lane
- Avoid sudden lane changes or erratic driving
Steps:
- Select “Dynamic Camera Aiming” in the ADAS tool.
- Follow on-screen prompts.
- Drive as specified until the tool confirms calibration is complete.
- Park the vehicle, turn off and restart the ignition.
- Review the final ADAS calibration report.
Post-Calibration Checklist
- Confirm that all DTCs have cleared.
- Test-drive the vehicle to verify proper ADAS functionality.
- Print and store the calibration report for service records.
When Should You Recalibrate the Honda ADAS?
Use this quick reference checklist:
Condition
Calibration Needed
Windshield replacement
✅ Yes
Front camera removal or replacement
✅ Yes
Suspension repair or adjustment
✅ Yes
Front-end collision repair
✅ Yes
Fault codes B2A60-54 or B2A60-52
✅ Yes
Software or module update
✅ Yes
Regular service without component change
❌ No
Common Issues During Calibration (and Fixes)
Issue
Cause
Solution
Calibration fails
Target not aligned correctly
Re-check distances and alignment
Error code persists
Fault not cleared before calibration
Clear all unrelated DTCs
Dynamic calibration not completing
Driving too slow or erratic
Maintain required speed and lane position
ADAS tool not detecting vehicle
Wrong region or VIN mismatch
Confirm correct vehicle selection
Conclusion
Proper calibration of the Honda ADAS system is essential for ensuring driver safety and system reliability. Whether you’re a certified technician or an advanced DIYer, following the correct steps using the appropriate tools guarantees that the front camera system functions accurately and complies with Honda’s OEM standards.
Always remember to:
- Use OE-approved calibration tools
- Follow structured calibration sequences
- Keep detailed service logs and calibration reports
Failing to calibrate after repairs or part replacements can lead to serious safety implications and potential liability. Stay compliant, stay safe.
Frequently Asked Questions (FAQs)
Q1: Can I skip static calibration if the camera is only slightly misaligned?
A: No. Even minor deviations can cause serious ADAS inaccuracies. Always perform full calibration.
Q2: Does calibration require a professional shop?
A: While DIY is possible with the right tools and knowledge, professional calibration is recommended for accuracy and liability coverage.
Q3: How long does the entire calibration take?
A: Static calibration typically takes 30–45 minutes; dynamic calibration may require 10–20 minutes of highway driving.
Q4: What happens if I don’t recalibrate after replacing the windshield?
A: The ADAS system may not function properly, increasing the risk of incorrect safety alerts or system failure.
**Need help with your Honda ADAS calibration?**Contact a certified technician or visit us for a diagnosis
Related reading
honda
Honda Vezel Car In Pakistan
In Pakistan, the Honda Vezel is the most popular crossover among both youngsters and adults. Honda introduced its hybrid category automobiles in the local market in the last decade to compete with Toyota’s hybrid vehicles. Over the years, Vezel has had a lot of success in Pakistan. While this is true, Honda fans were disappointed […]

honda
Honda Millimeter Wave Radar
Millimeter Wave Radar Millimeter wave (mmWave) is a special class of radar technology that uses short-wavelength electromagnetic waves. Radar systems transmit electromagnetic wave signals that objects in their path then reflect. By capturing the reflected signal, a radar system can determine the range, velocity, and angle of the objects. The millimeter wave radar is often […]
honda
Honda Sensing Safety
About Honda & Honda Sensing Safety Honda Sensing is an advanced safety suite designed by Honda to enhance driver awareness and help prevent collisions on the road. This innovative technology incorporates a range of features that work together to provide a safer driving experience. It includes adaptive cruise control, which automatically adjusts the vehicle’s speed […]

honda
Best Suspension Parts at Fixmycar.pk
Why Are Suspension Parts Important for Your Vehicle? Best Suspension parts play a crucial role in ensuring a smooth, stable, and comfortable ride. A well-maintained suspension system helps: Absorb shocks from rough roads Improve handling and control Enhance overall driving comfort For vehicles like 4×4s, suspension becomes even more critical due to off-road demands. Why […]

honda
Honda Civic Turbo Transmission Failures
Honda Civic Turbo Transmission Failures: Questions and Answers What Is the Honda Civic Turbo? The Honda Civic Turbo is a modern version of Honda’s popular compact car equipped with a turbocharged engine designed to deliver better performance while maintaining fuel efficiency. Many recent Civic models use a 1.5-liter turbocharged engine that produces more power than […]
adas
Crawl Control : Advics Regenerative Braking System AHB-Rx
Regenerative Hybrid Braking System Toyota is a company that never stops evolving, a year passes and they are rolling out a new feature with such advancement and simplicity that it becomes a gold standard for the automotive industry. Toyota is pioneering in giving reliable Hybrid Synergy technology to all kinds of automobiles. Since we all […]